Ever noticed how people keep “thinking about it” and end up not buying from your store?
A very common scenario in online stores. So, how do you give that “extra push” to your customers so that they are more encouraged to purchase?
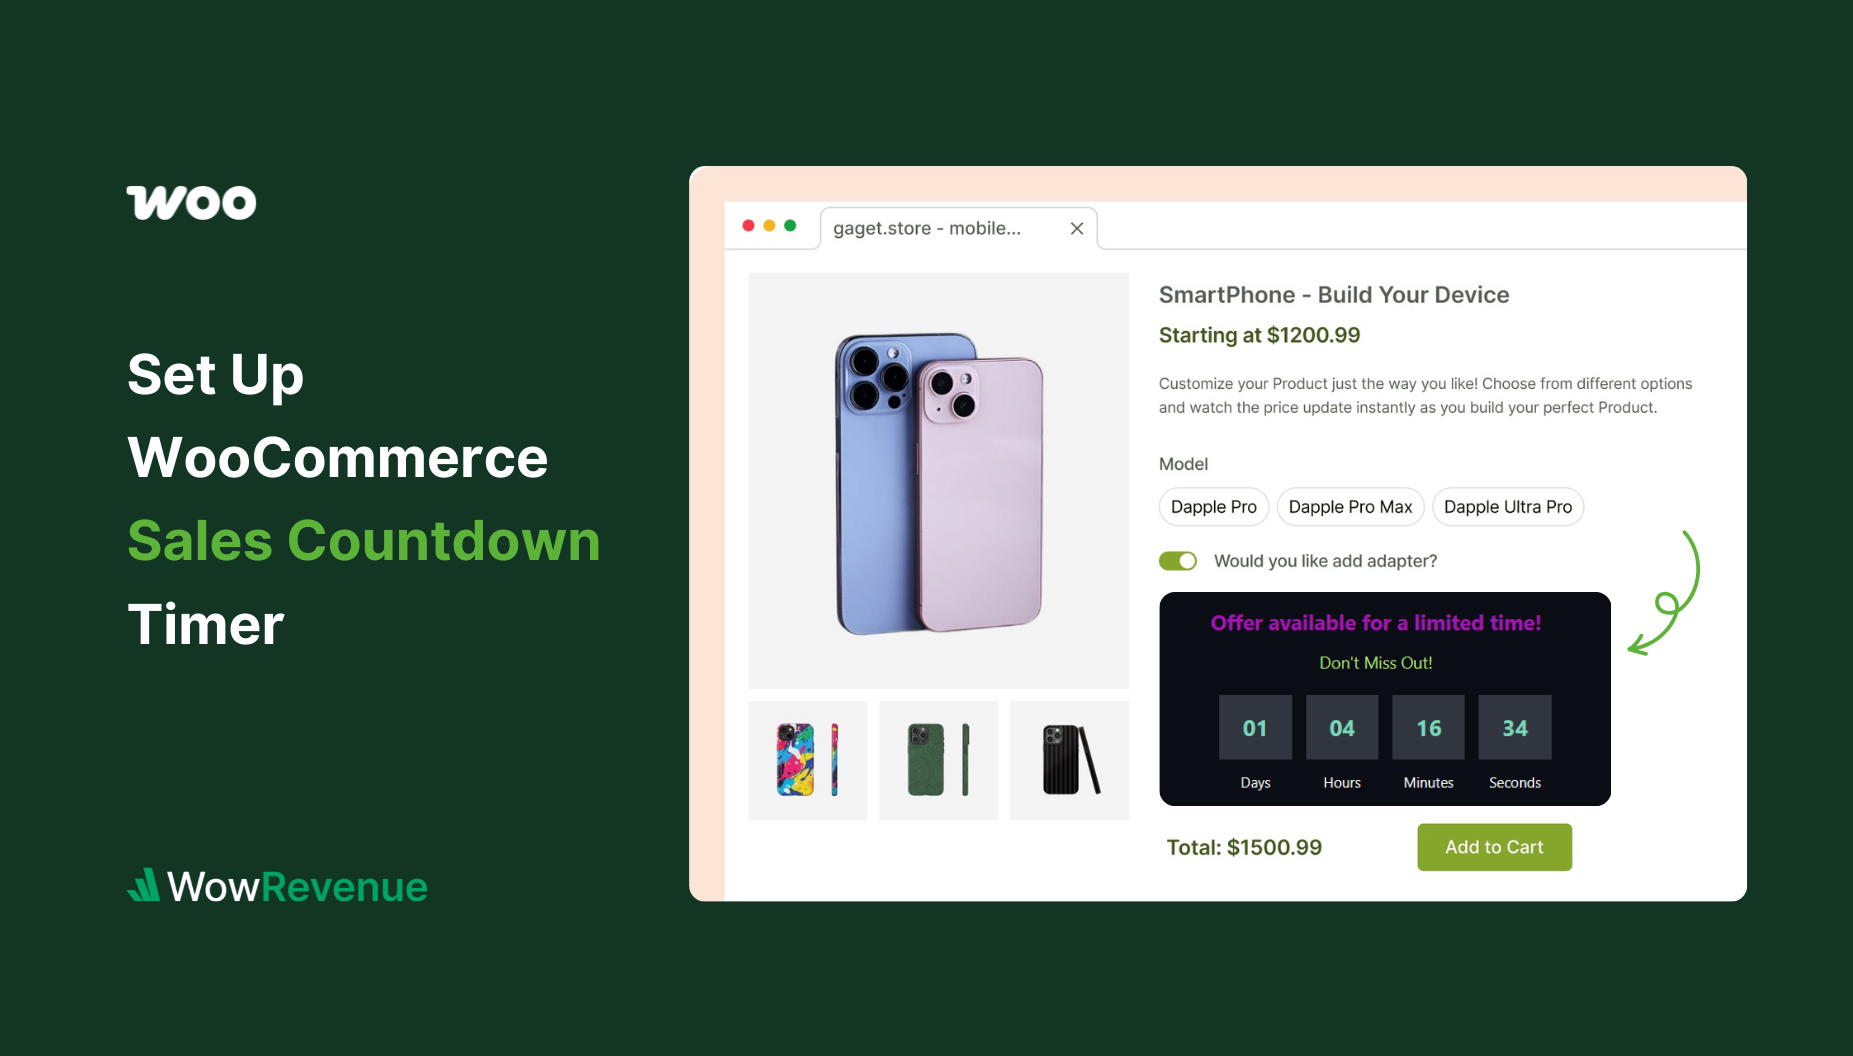
A sales countdown timer can be an effective solution. It’s a simple tactic, but it works like magic when done right.
In this guide, I’ll show you how to easily set up the countdown timer in your WooCommerce store using WowRevenue – without any coding or complicated setups.
Here’s a quick look at the steps I’ll cover:
- Set up your sales countdown timer campaign
- Choose where and when you want the timer to show
- Select specific products or categories
- Set a static, evergreen, or recurring schedule
- Customize the text and design for the timer
So, to learn the detailed explanation for the entire process, continue reading the entire article.
If you would like to watch a tutorial on the sales countdown timer, we have prepared a video guide for you:
What is The Sales Countdown Timer In WooCommerce?
A sales countdown timer in WooCommerce is a visual timer that shows customers how much time they have left to grab a special deal, discount, or promotion before it expires.
It’s an effective strategy to create a sense of urgency, encouraging customers to take action faster instead of delaying their purchase decisions.
Practical use cases for a sales countdown timer include:
- Flash Sales: Display a countdown for short-term discounts that are applicable for only a few hours or days.
- Holiday Promotions: Run countdowns for seasonal events like Black Friday, Cyber Monday, or Christmas sales.
- Limited-Time Offers on Specific Products: Highlight deals on new arrivals, best-sellers, or stock-clearance items.
- Sitewide Sale Events: Create a timer across your entire WooCommerce store to promote big sale campaigns.
So, a countdown timer does not just make your store look interesting but also brings real results by improving the conversion rate.
Choosing The Best Countdown Timer Plugin For WooCommerce
I will be honest with you, there is no shortage of sales countdown timer plugins for WooCommerce. No matter which plugin you choose, you should consider the following criteria:
- Ease of Use: You should be able to set up your timer without any technical skills.
- Flexible Targeting: The plugin should let you choose specific products, pages, or entire site areas where the timer will appear.
- Customization Options: You should be able to match the timer’s design with your brand – colors, fonts, and spacing, all should be easily adjustable.
- Flexible Scheduling: Set start/end dates, recurring countdowns, and day-specific timers for running campaigns strategically.
- Performance: The plugin should be lightweight and fast, not slowing down your site.
- Affordable Pricing: It should offer great features at a fair price, ideally without expensive recurring fees.
Though there are many amazing plugins meeting some of the above criteria, WowRevenue fits the bill perfectly.
It offers advanced customization options for countdown timers while being very budget-friendly.
In addition to this campaign, you get to set up other effective sales-boosting campaigns such as Buy X Get Y, bulk discount, frequently bought together, product bundles, and so much more.
It’s built specifically for WooCommerce store owners who want to set up high-converting offers without complexity or extra costs.
Step-By-Step Guide to Set Up Sales Countdown Timer in WooCommerce
In this section, you will learn the detailed steps of how to set up a sales countdown timer in your WooCommerce store.
Before you start, make sure you have installed and activated the WowRevenue plugin.
The installation process is similar to any other WordPress plugin – navigate to the Add Plugin section in your admin dashboard, search for WowRevenue, click on Install Now and Activate.
If you are still not sure about the process, we have a setup documentation for you.
Now, let’s see the process of displaying a sales countdown timer that increases the conversion rate in your store:
Step 1: Set Up A Sales Countdown Timer Campaign
After installing WowRevenue, go to its dashboard section. Now, click on the Create Campaign button. You will see a list of available campaigns offered by WowRevenue.
You need to choose the Countdown Timer campaign. So, click on the Create the Campaign button under it. You will land on the campaign setup page.
Step 2: Choose The Target Pages For The Countdown Timer
From this setup page, first, select the pages where the countdown timer will be displayed.
You have the option to show the timer at multiple locations (product page, cart page, and more) in your WooCommerce store. Based on your business strategy, you can choose the options.
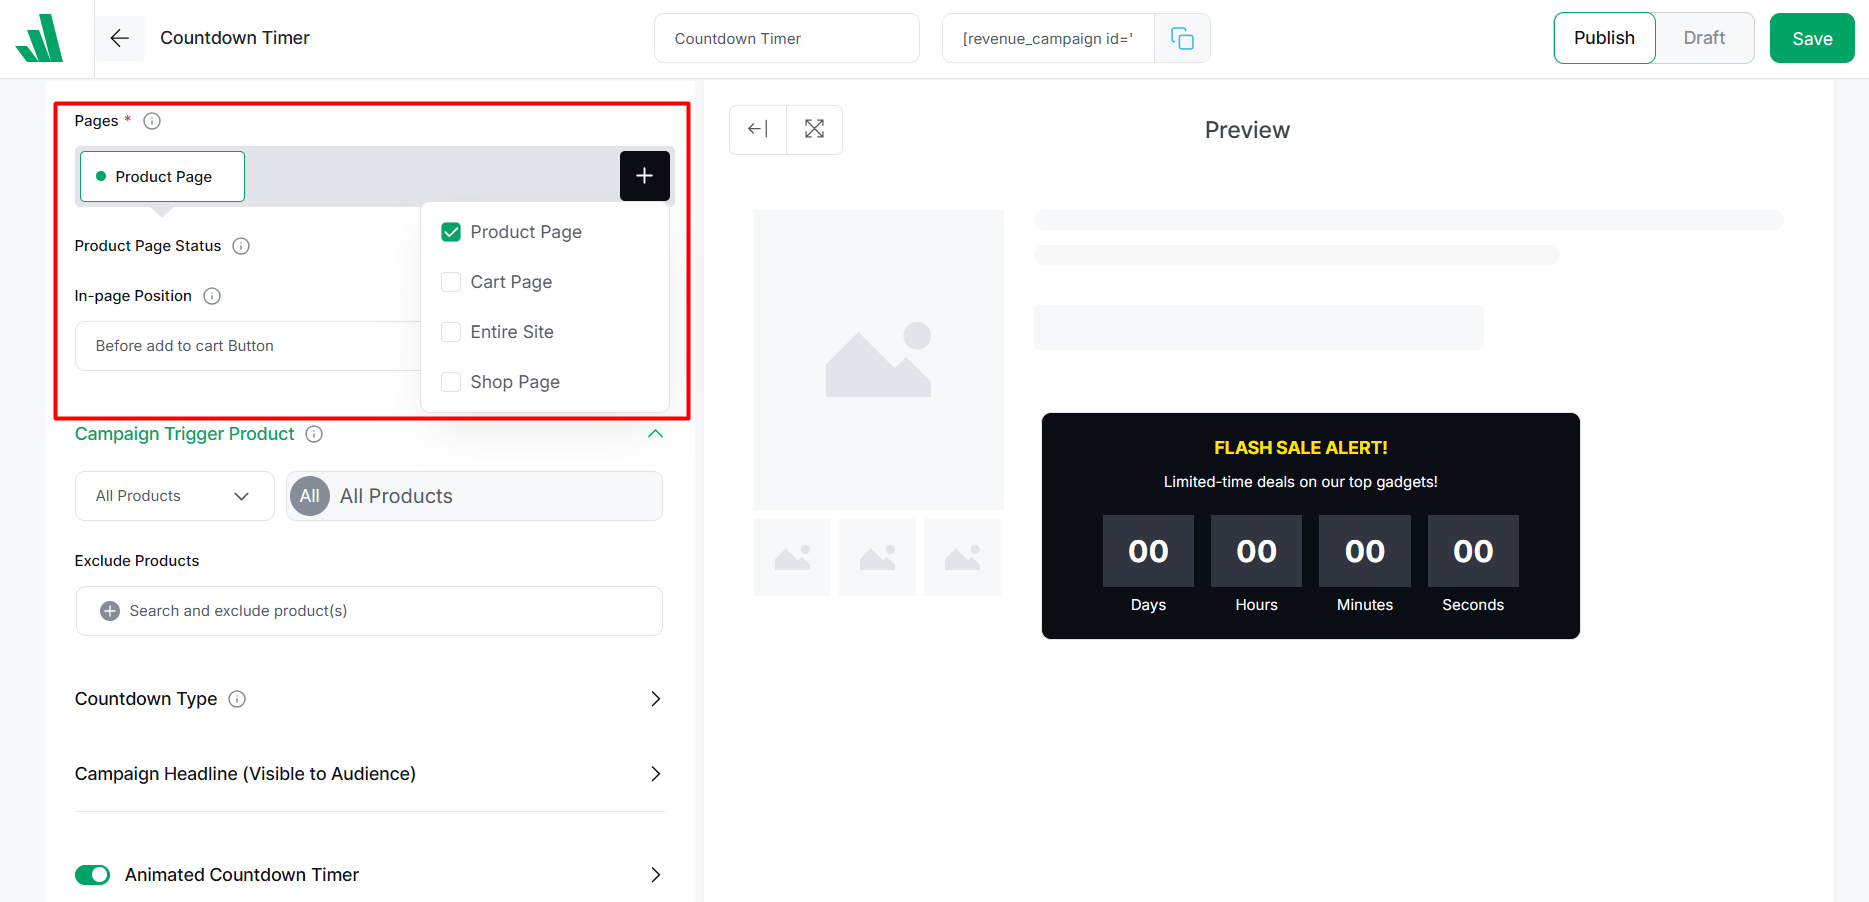
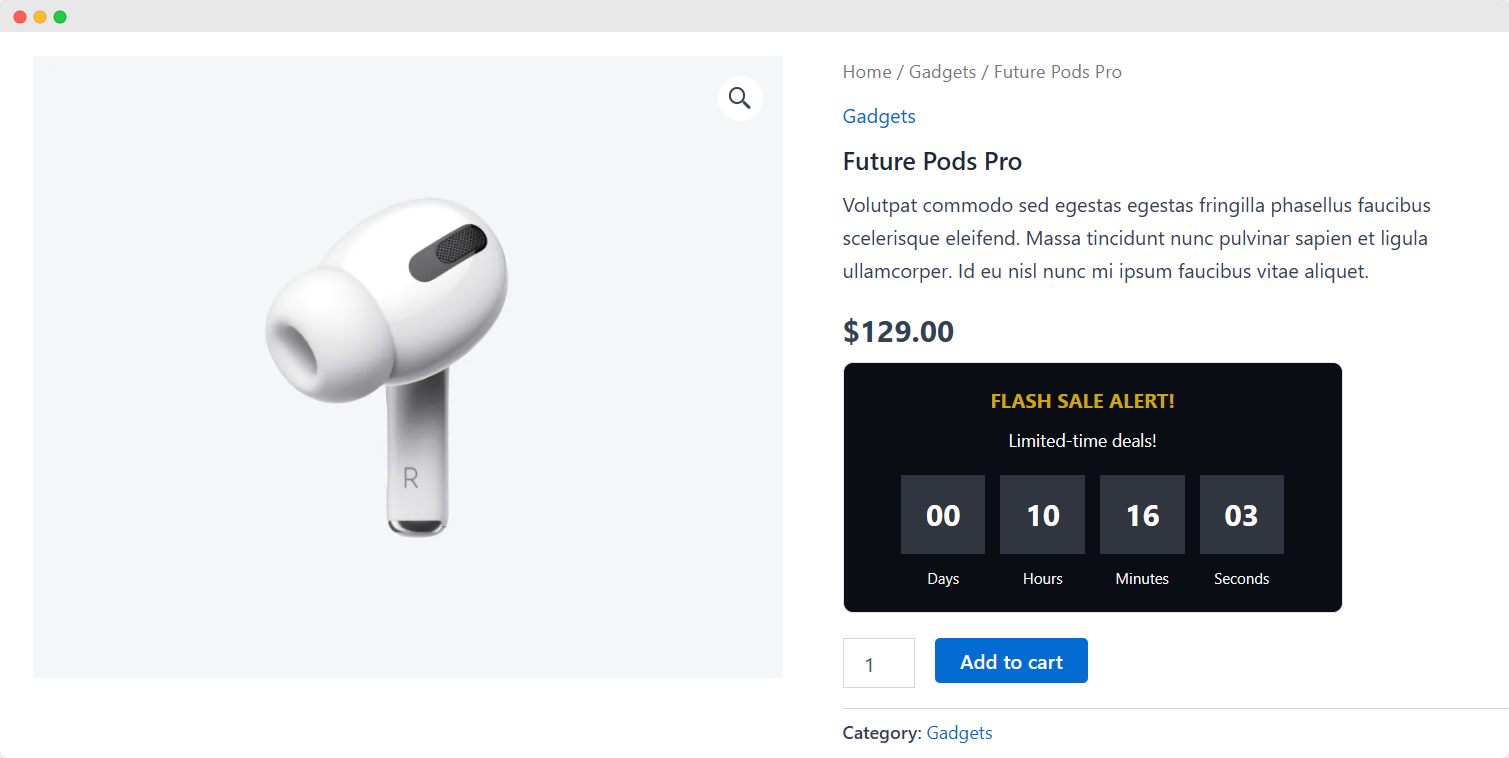
Display The Countdown Timer on The Product And Shop Page
Want to boost conversion when customers are exploring your shop page and product pages? Then, display the countdown timer on those pages. It creates a FOMO (fear of missing out) among customers and encourages them to add products to their cart faster.
Reduce Cart Abandonment By Showing The Timer on The Cart Page
Tired of customers leaving their carts and not purchasing anything? Showcase the timer on the cart page to remedy this. Customers will feel the urgency to proceed to the checkout page.
Run A Sitewide Sale Campaign By Selecting the Entire Site
Running a seasonal flash sale and want to notify your customers when they visit your store? Having a countdown timer sitewide is the best way to do this.
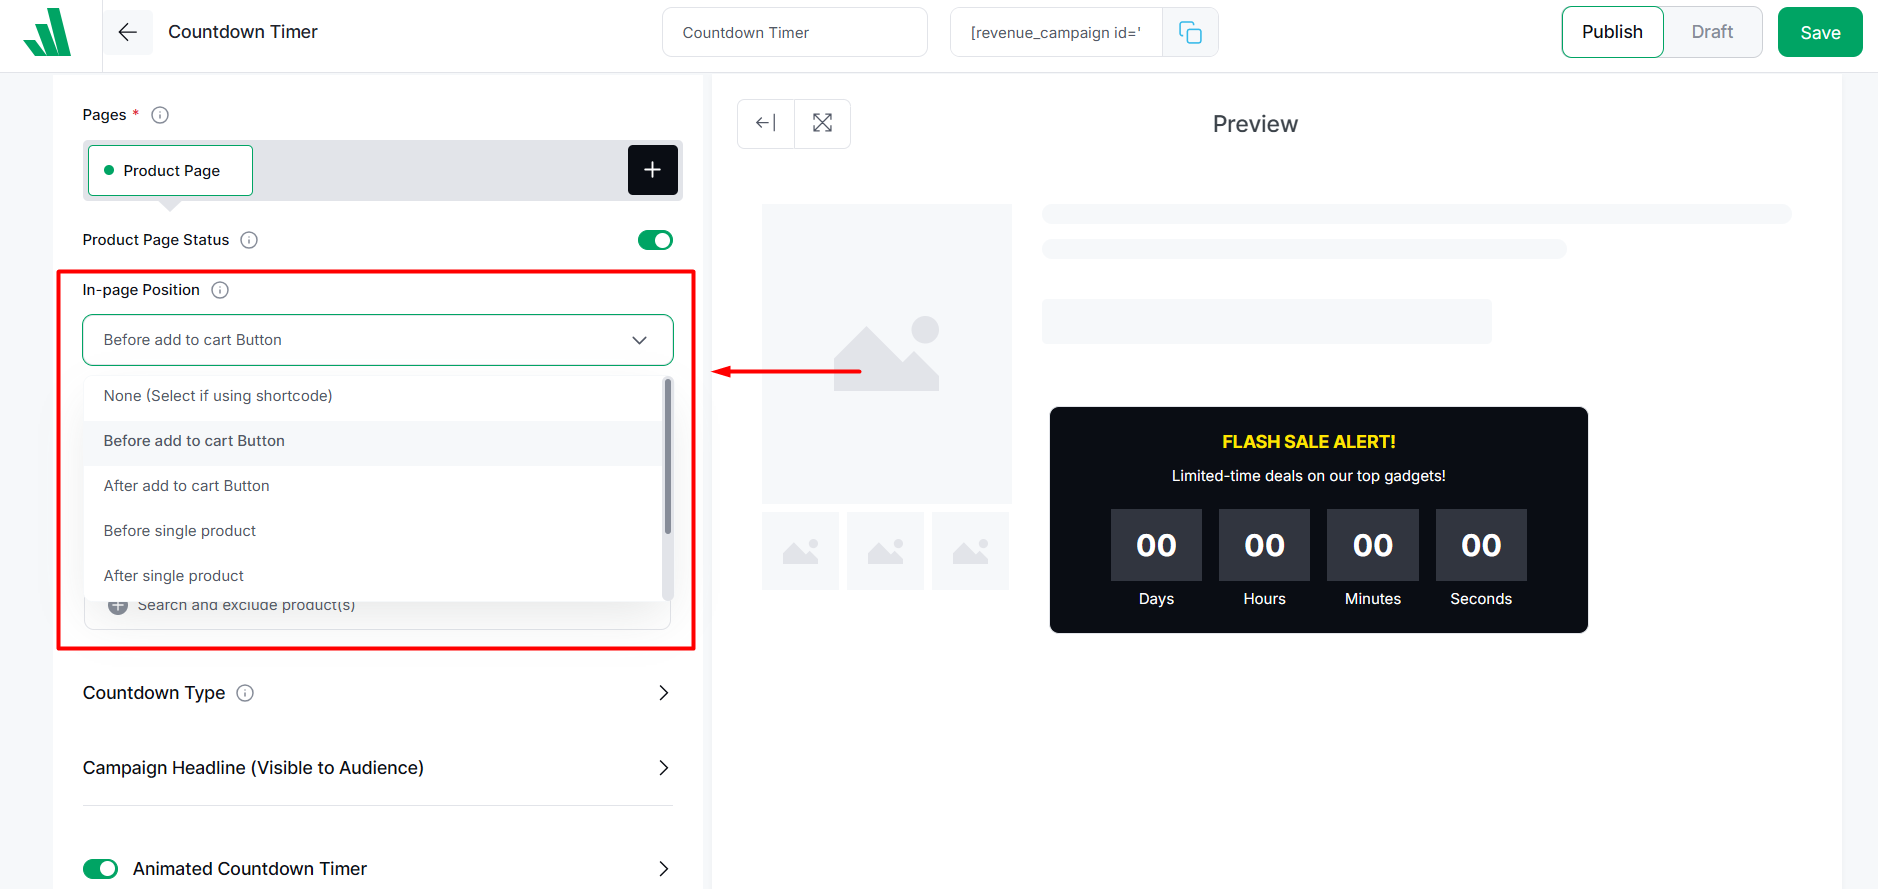
Step 3: Set The Position For The Timer on The Target Page
You can also define the positioning for the timer on your selected pages. You will find the settings under “In-page Position”.
For example, if you choose Product Page, you can display the timer on –
- Before Add to Cart button
- After Add to Cart button
- Before single product
- After single product
And so on. Based on what you chose as the target page, the positioning options will change.
Step 4: Select Specific Products/Categories For The Timer
You can show the countdown timer for all products in your store.
But you have the option to limit the sale timer for only a handful of products – let’s say, the high-demand products, or maybe undersold products – whatever the reason may be, WowRevenue lets you set it up.
- Under the Campaign Trigger Product setting, select Specific Products or Specific Category from the dropdown.
- After that, select the specific items from the dropdown on the right side.
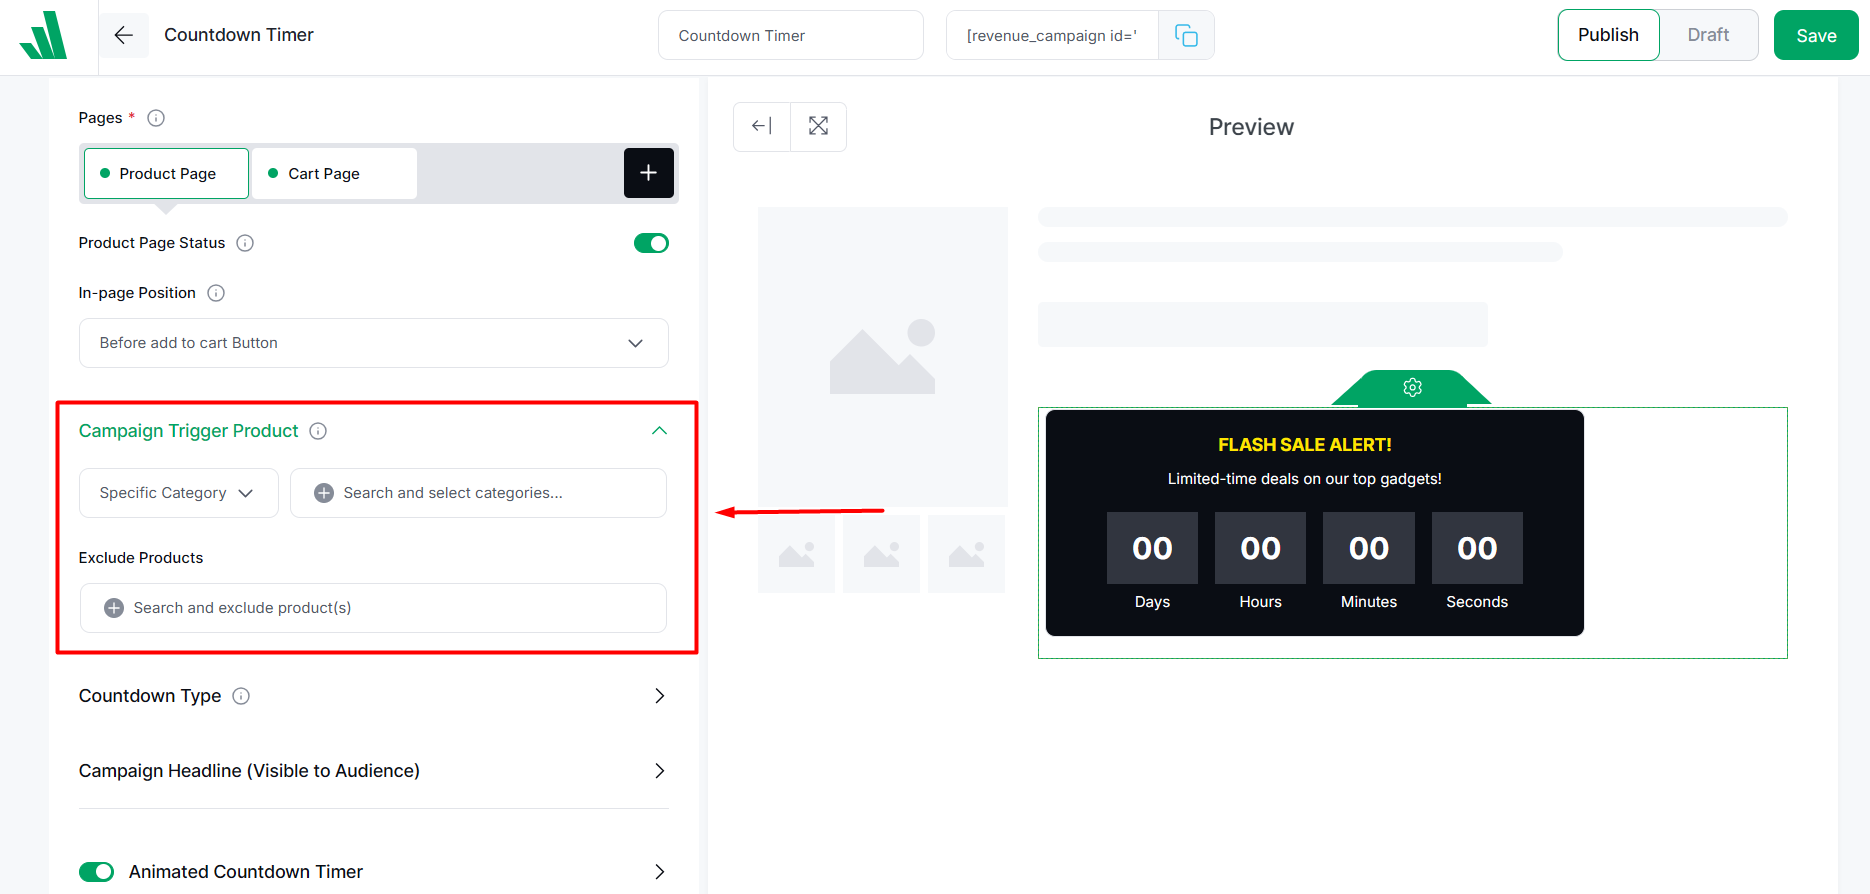
You also have the option to exclude products from a list of products, for example, a specific category of products.
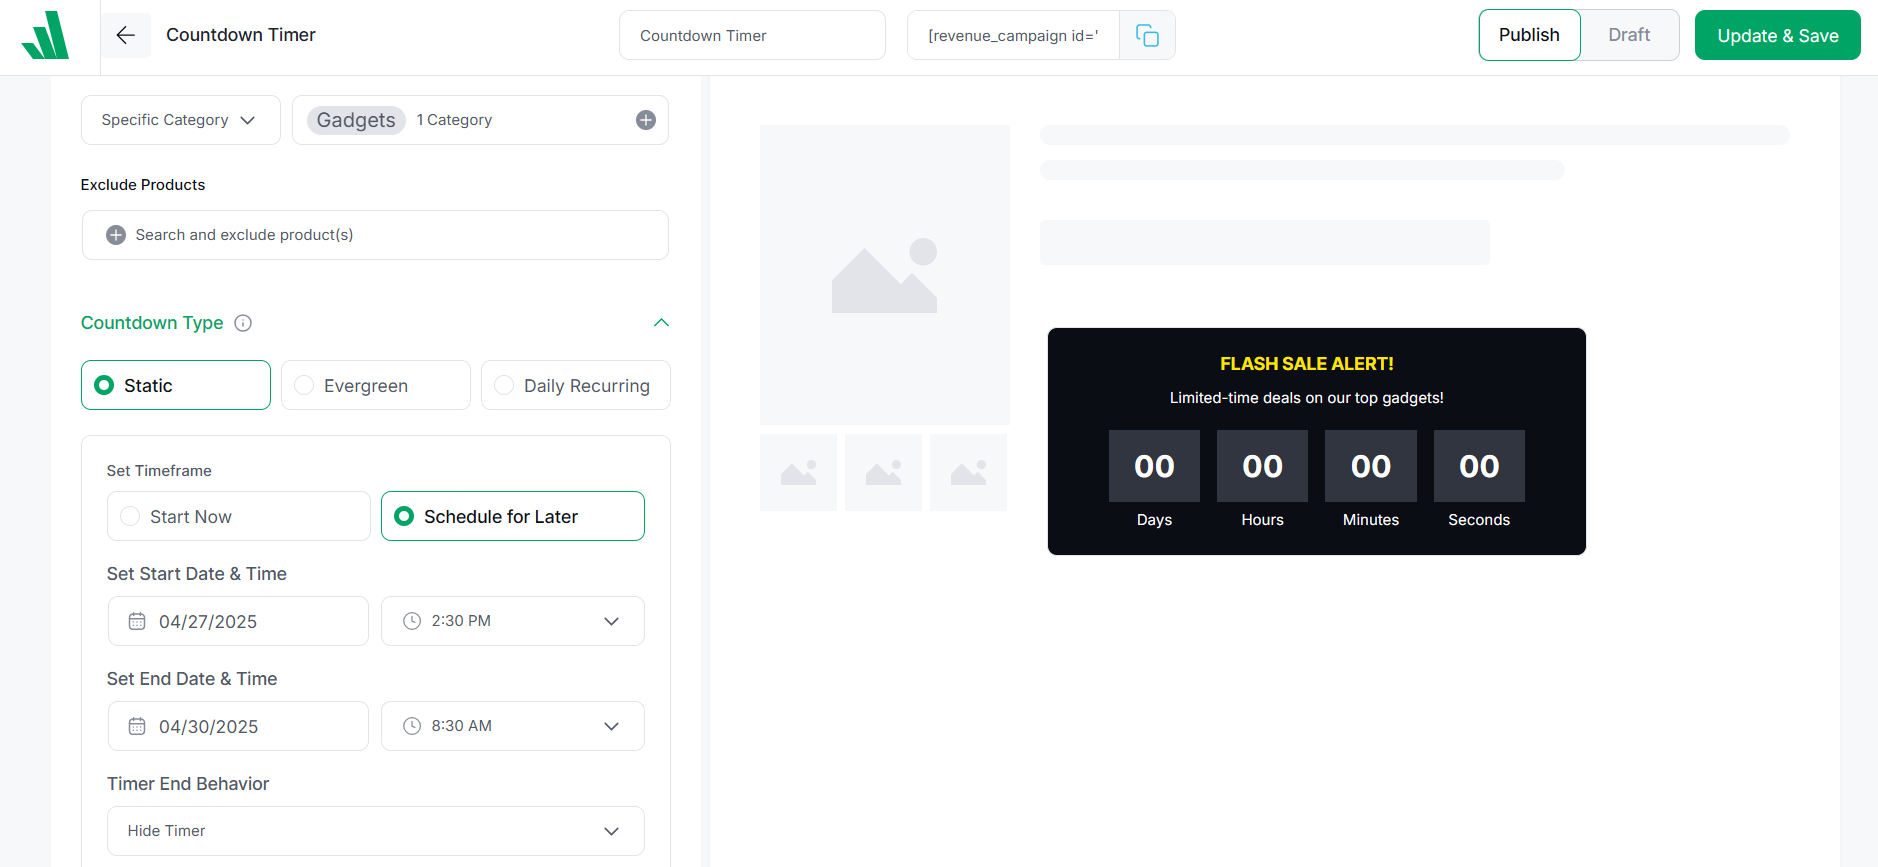
Step 5: Set a Schedule for the Countdown Timer
Countdown timer wouldn’t be effective if you cannot schedule it properly. And WowRevenue gives you an advanced scheduling feature.
Under the setting, Countdown Type, choose the way you want to schedule the timer. You have the options:
- Set start date and time, and end date and time
- Repeat the timer after a specific time
- Show it on recurring days and times
Step 6: Set Custom Text to Promote the Sale
Now, you should choose a custom text for your sale countdown timer. Something that will entice your customers to buy your products.
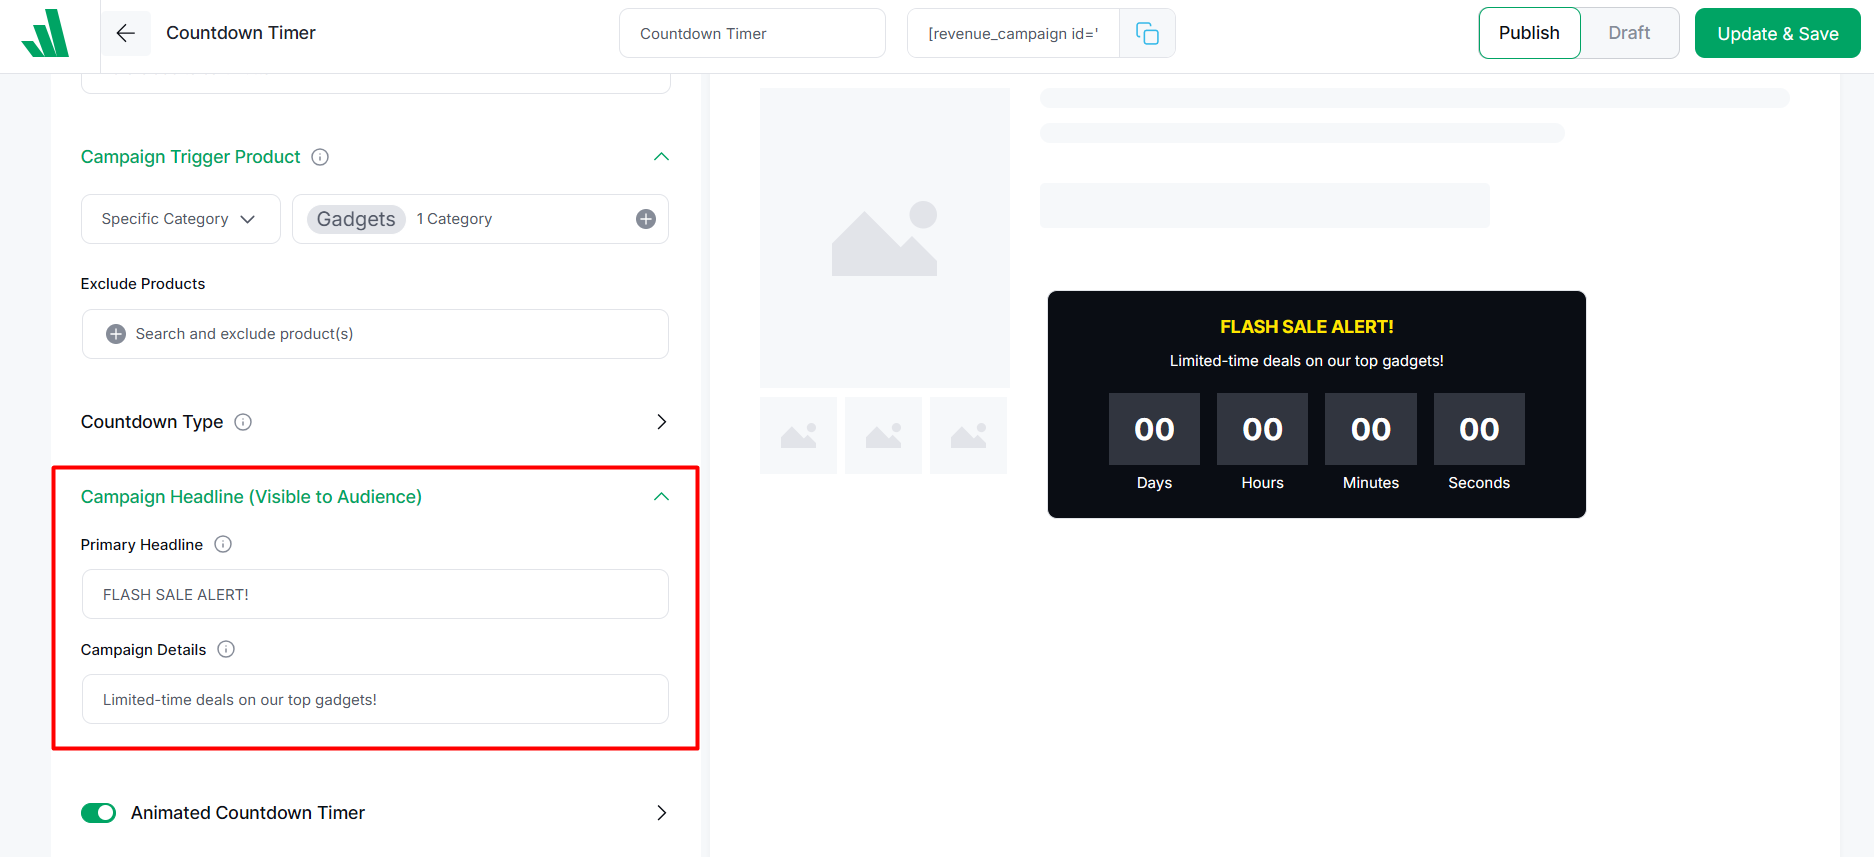
This can be as simple as “Don’t miss out, 20% OFF for a limited time”. But you can customize it just the way you want.
Under the Campaign Headline, set a primary headline – this is usually used to convey the main idea about your sales.
To add further information, put in details under the Campaign Details field.
Step 7: Customize the Design for the Timer
It won’t be very conversion-friendly if your sales countdown timer looks boring. Luckily, you can customize the color, text, spacing, and more to give the timer a unique look.
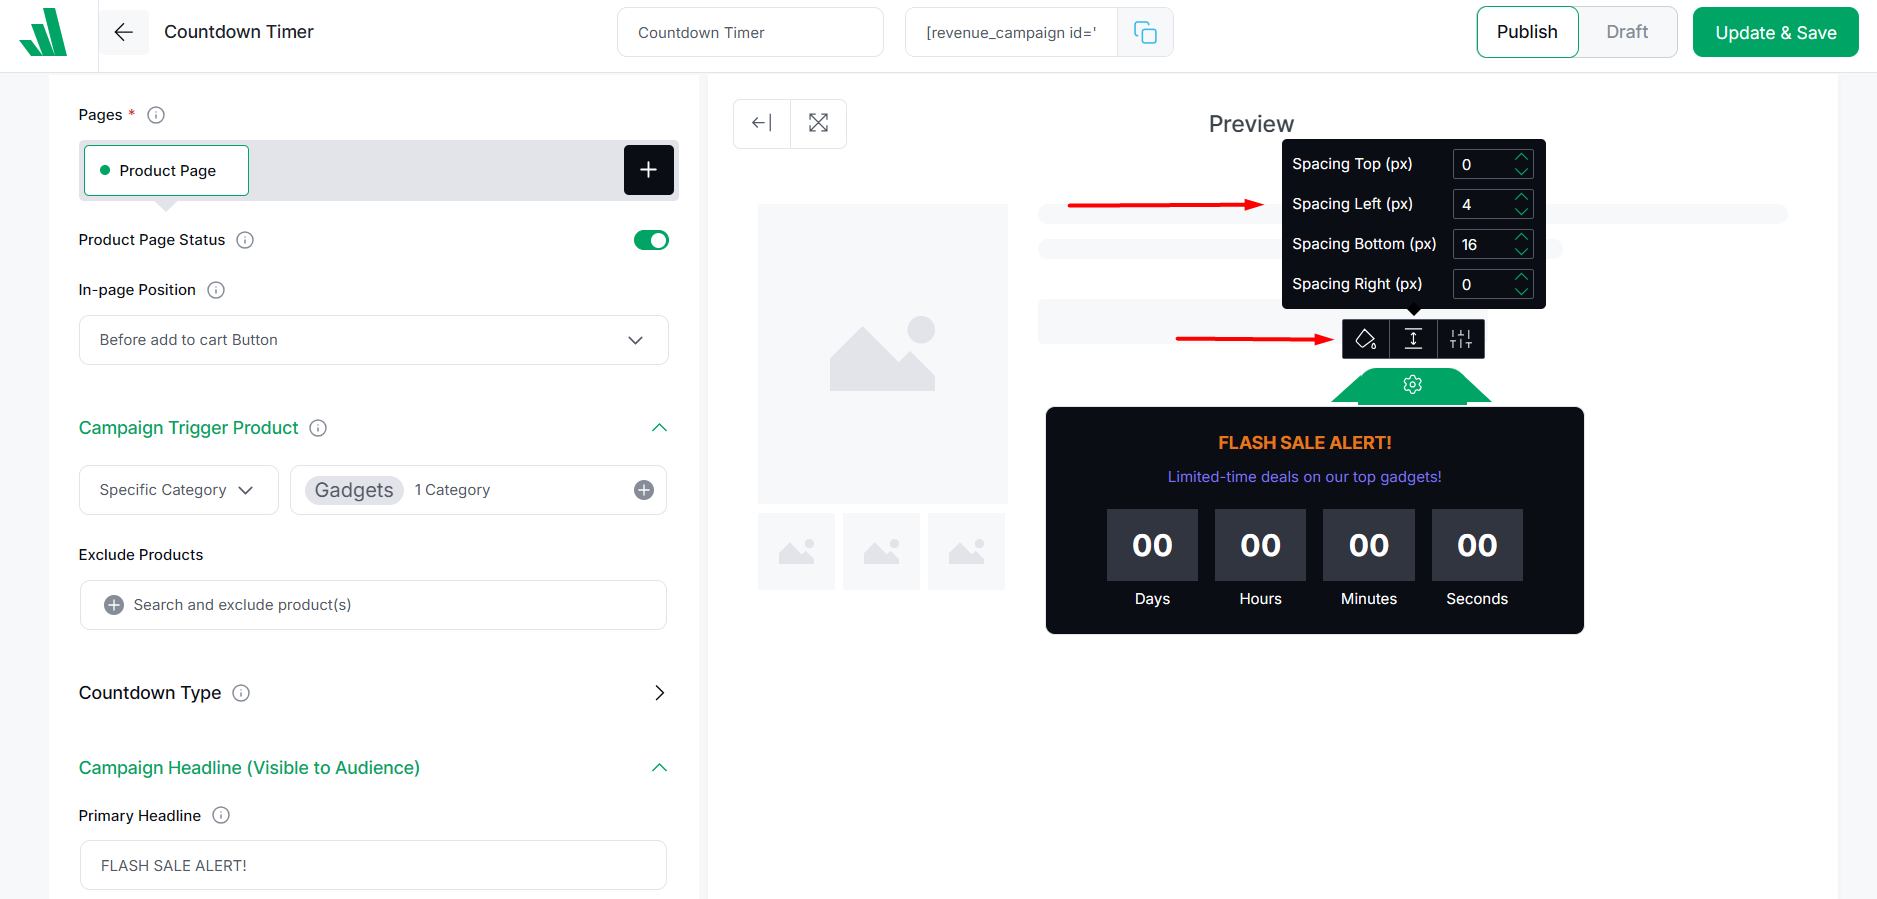
You may have already noticed a Preview section on the right side of the campaign setup page.
Here, click on the gear icon on top of the countdown timer. You will see options like Color, Spacing, Border – allowing you to control the entire timer’s look. Also, you can customize individual elements’ design too.
Can I Display The Countdown Timer Only For The Products I Choose?
Yes, you can display countdown timers for specific products using the plugin WowRevenue. It is a great way to promote your popular items, new arrivals, or even clearance items.
To set this up, simply follow these steps:
- Create a countdown timer campaign using WowRevenue
- Select target pages for the campaign
- Choose the specific products under trigger products setting
- Set sale schedule for the timer
- Customize text and design for the timer
And by following these easy steps, you can create urgency on specific product pages you need the most.
Can I Show The Sales Countdown Timer on Specific Days of The Week?
Yes, you can show a countdown timer on specific days of the week on your online store using the WooCommerce plugin, WowRevenue. By setting a Recurring Schedule for the countdown timer, you can easily achieve this.
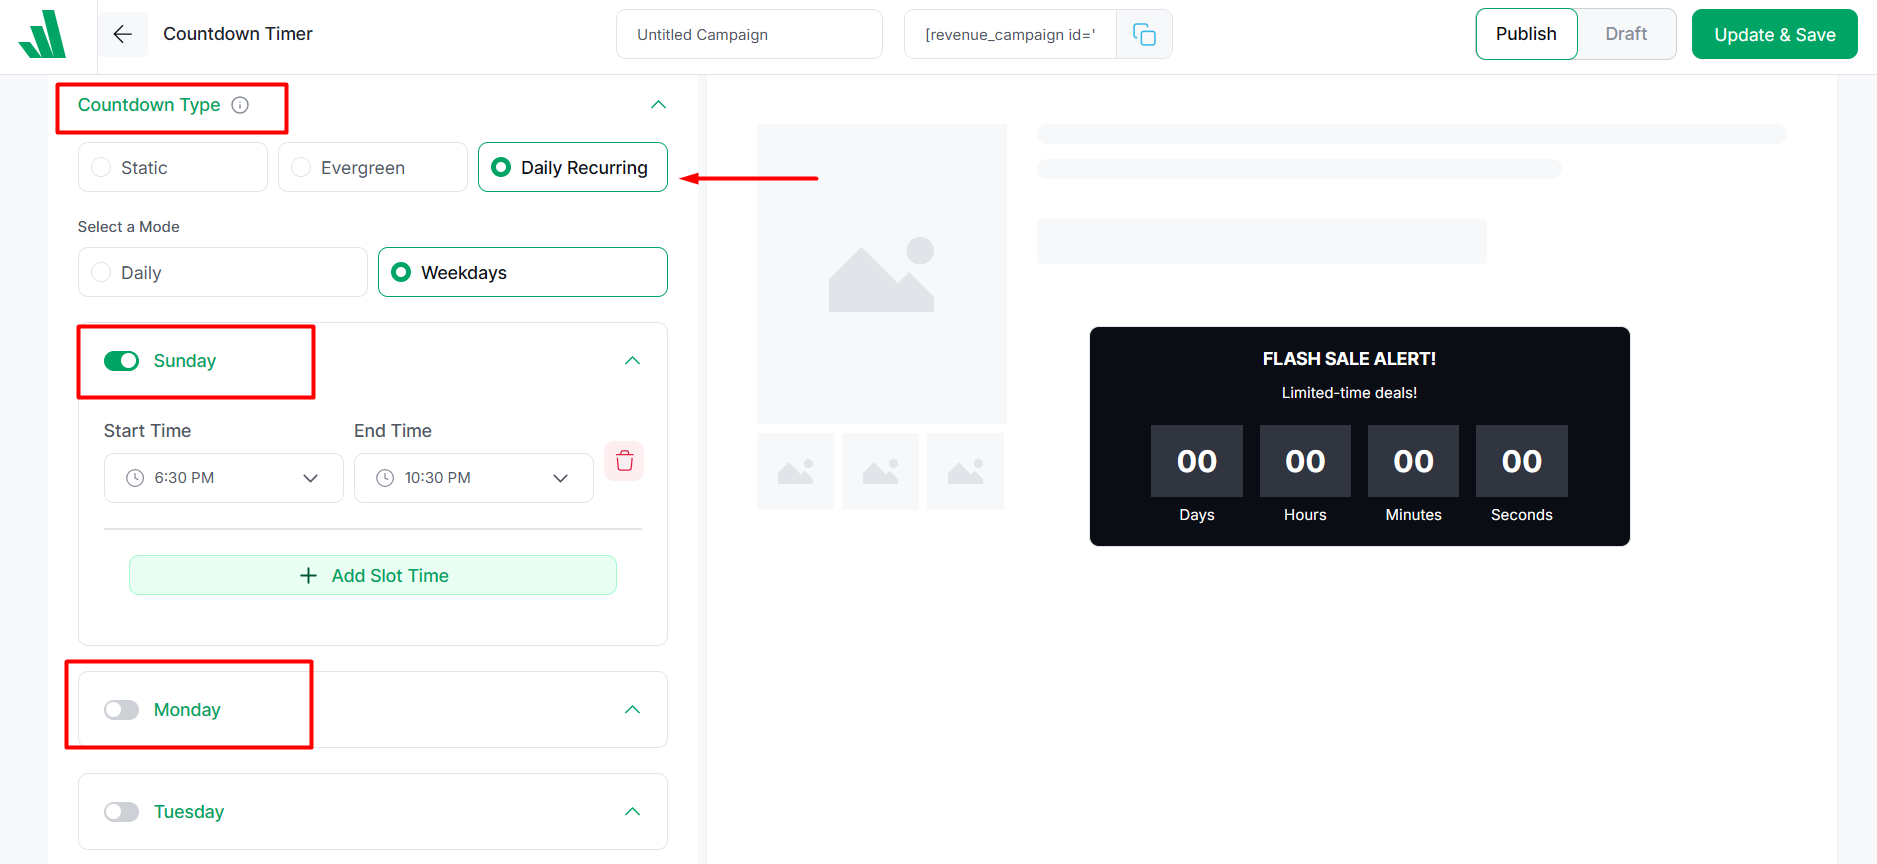
Here are the steps to follow:
- Set up a countdown timer campaign with WowRevenue
- Select the target page and trigger products for the timer
- Under Countdown Type, choose Daily Recurring > Weekdays
- Choose the specific days and enable the toggle for them
- Under each day, you can select a specific start and end time
So, using this scheduling feature, you can easily choose exactly which days and time slots the countdown should be visible.
This type of countdown timer is perfect for running weekly flash sales, Friday specials, or weekend-only deals.
How Can I Create Evergreen Sales Countdown Timers for My Store?
You can create evergreen countdown timers using a WooCommerce plugin like WowRevenue. This type of countdown timer is displayed continuously and repeated every few hours, days, or a set amount of time.
It is useful to create an ongoing sense of urgency without setting a strict expiry date.
For example, you can run a 24-hour timer that resets every day — giving your customers the feeling they are getting a limited-time offer every time they visit your shop.
Here’s how to set up the evergreen timer:
- Create a Countdown Timer campaign using WowRevenue
- Choose your preferred target pages and target products
- Under the Countdown Type, select Evergreen
- Choose the time for how long the timer will be active
- Enable the option “Repeat after finished” to keep the timer going
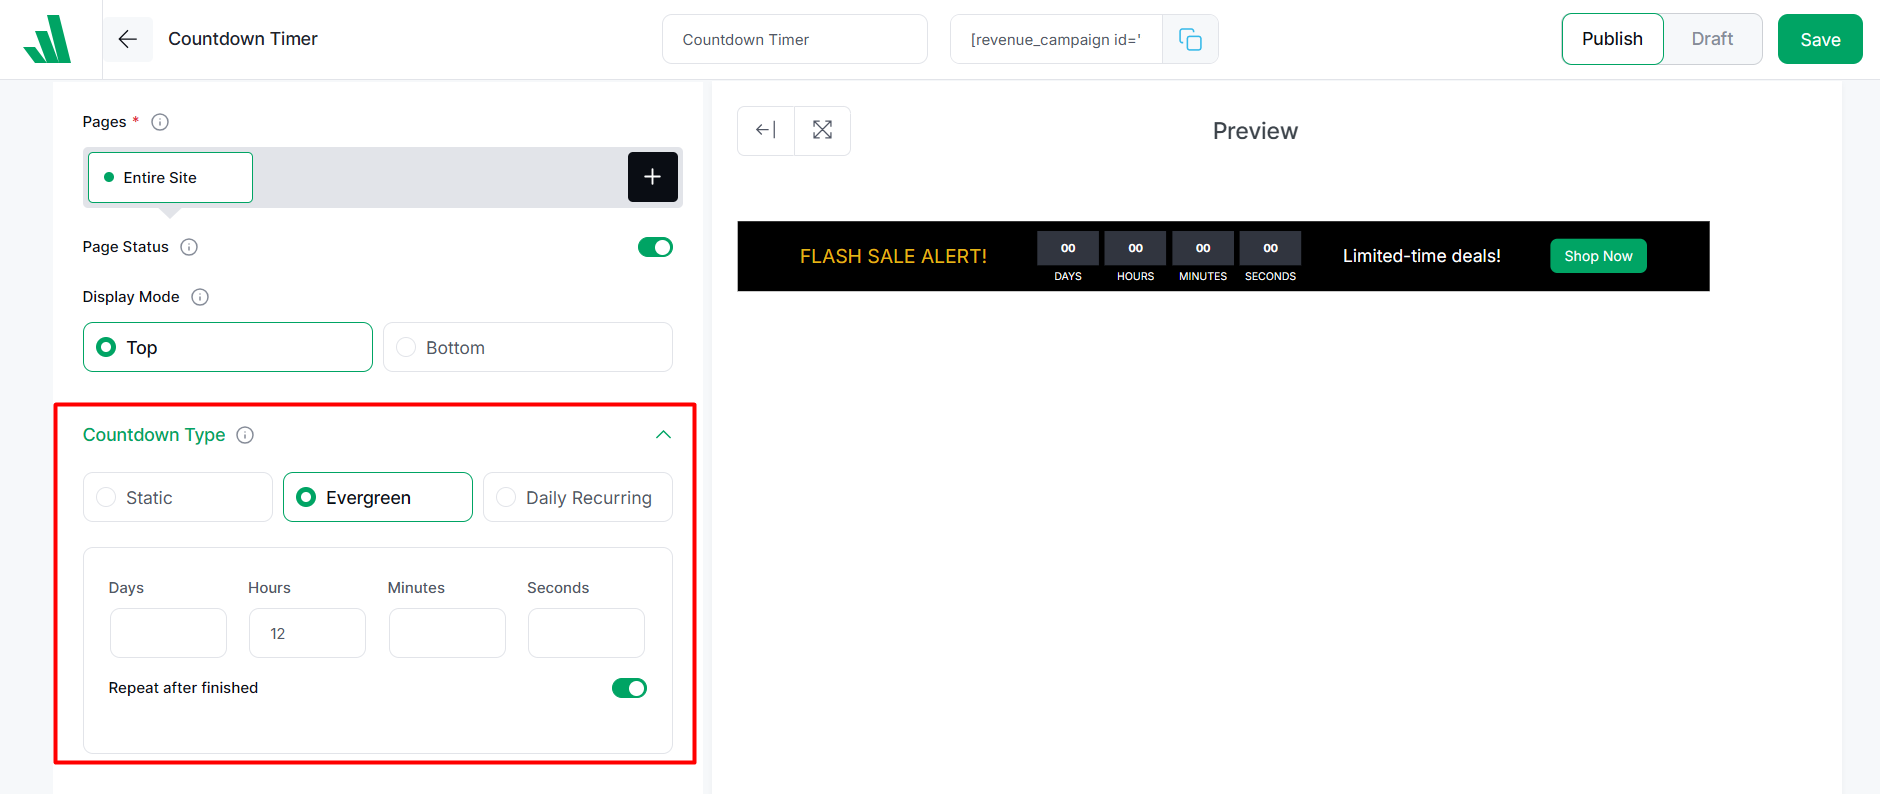
For example, I want to repeat my evergreen timer to be repeated every 12 hours, so I put 12 in the Hours input field.
Benefits of Displaying Sales Countdown Timers in WooCommerce
Sales countdown timer offers several benefits for your WooCommerce store – from creating urgency to promoting new products, it can be an effective strategy when you do it right.
Let’s see some of its advantages in more detail:
Instantly Creates Urgency and FOMO
People naturally respond to urgency.
When customers see a ticking clock, it triggers the fear of missing out (FOMO), making them much more likely to buy right away instead of “thinking about it” and forgetting later.
This leads us to the next point.
Boosts Conversions Across The Funnel
When visitors browse your online shop and notice limited-time offers through countdown timers, they are more likely to Take Action.
For instance, showing a sitewide timer as a banner on your store or placing it on the cart page can greatly reduce cart abandonment.
Smarter Limited-Time Campaigns and Product Launches
Running a flash sale? Launching a new product with a special early-bird price?
Countdown timers help you highlight these campaigns perfectly.
As a store owner, you need to promote the offers you are providing, and a countdown timer is a great way to convey those lucrative deals.
Summing Up
Okay, now you know what a sales countdown timer is, how to set it up in your WooCommerce store, and how it can benefit your business.
As already mentioned, adding a sales countdown timer to your online store is one of the easiest ways to boost urgency, drive more sales, and improve overall conversions.
And with WowRevenue, you can easily set up a stylish, high-converting countdown timer that takes just a few minutes – no complicated steps required.
If you’re promoting a sales campaign, give WowRevenue a try and see how it can improve your conversion rate and sales!