
The Mix and Match Product campaign lets customers build their own bundle by choosing products from a selection you provide.
To get started, simply visit WowRevenue’s dashboard, click on the Create Bundle button to land on the bundle selection page. From here, choose Mix Match Single or Mix Match Sectioned.
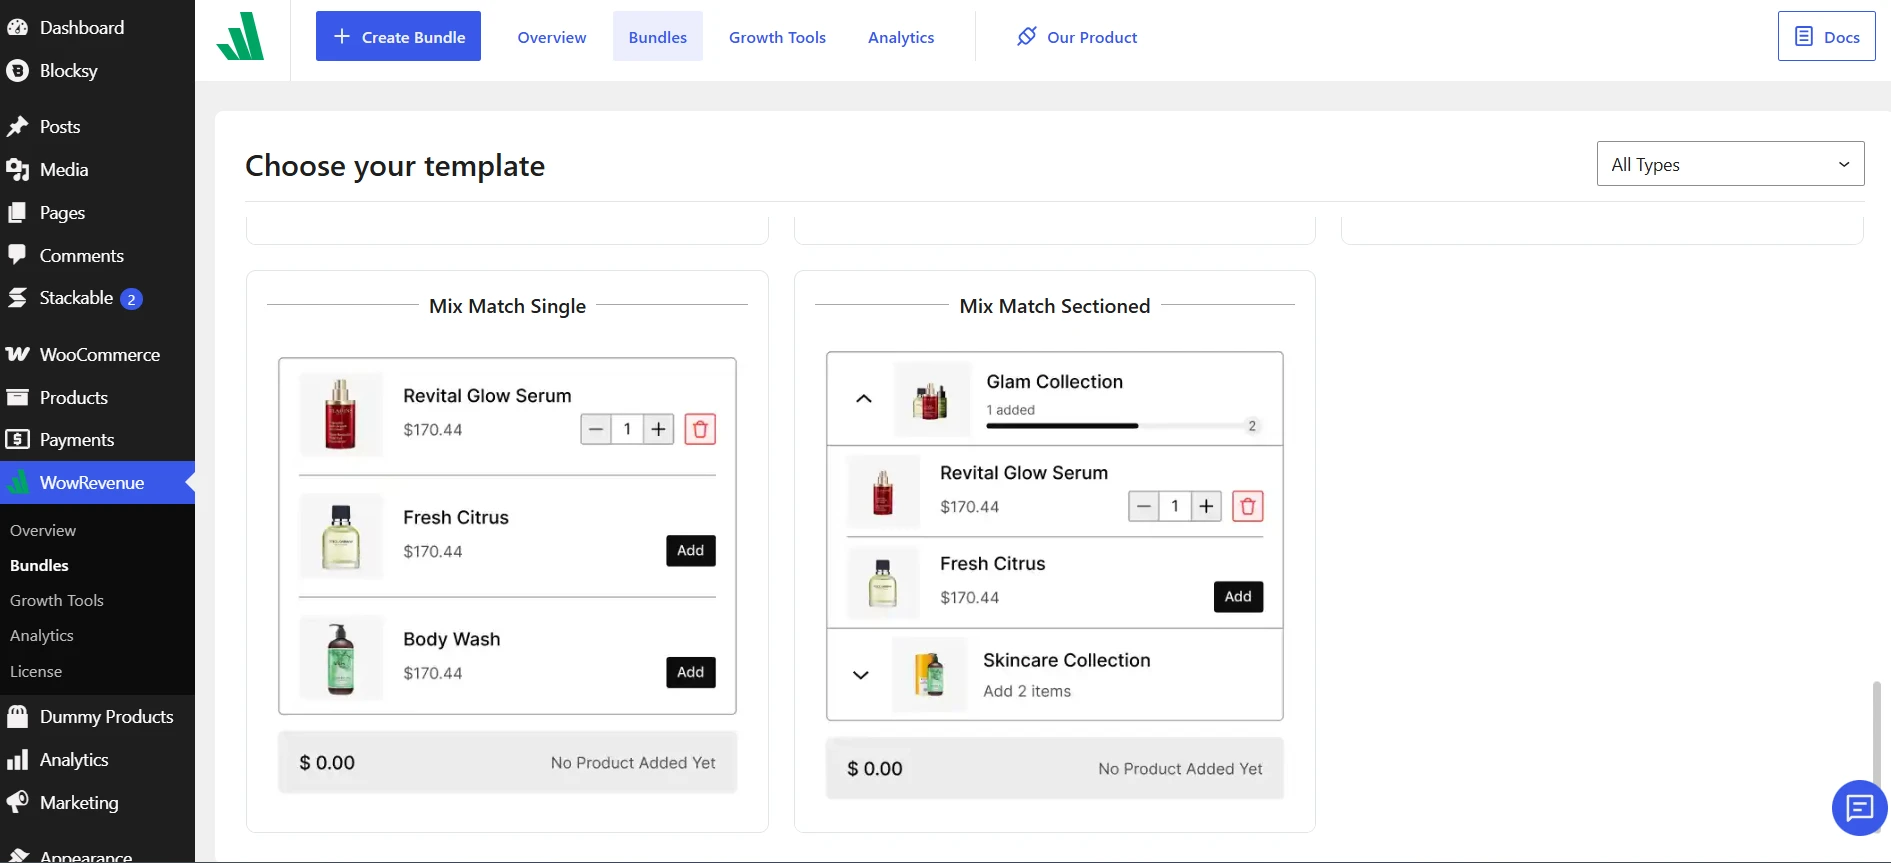
- Single List to display all available products together in one list.
- Sectioned List to organize products into separate groups or collections.
Choose the structure that best matches how you want customers to build their bundle.
The Product Setup section also shows the current bundle type.
Click Change Type if you want to switch the Mix and Match structure. WowRevenue supports:
Mix and Match Single Style
First, let’s see how to set up mix and match with a single list layout.
Choose Products for the Mix and Match Bundle
Start from the Product Setup section. Click Add Products and select the products customers can choose from while building their bundle.
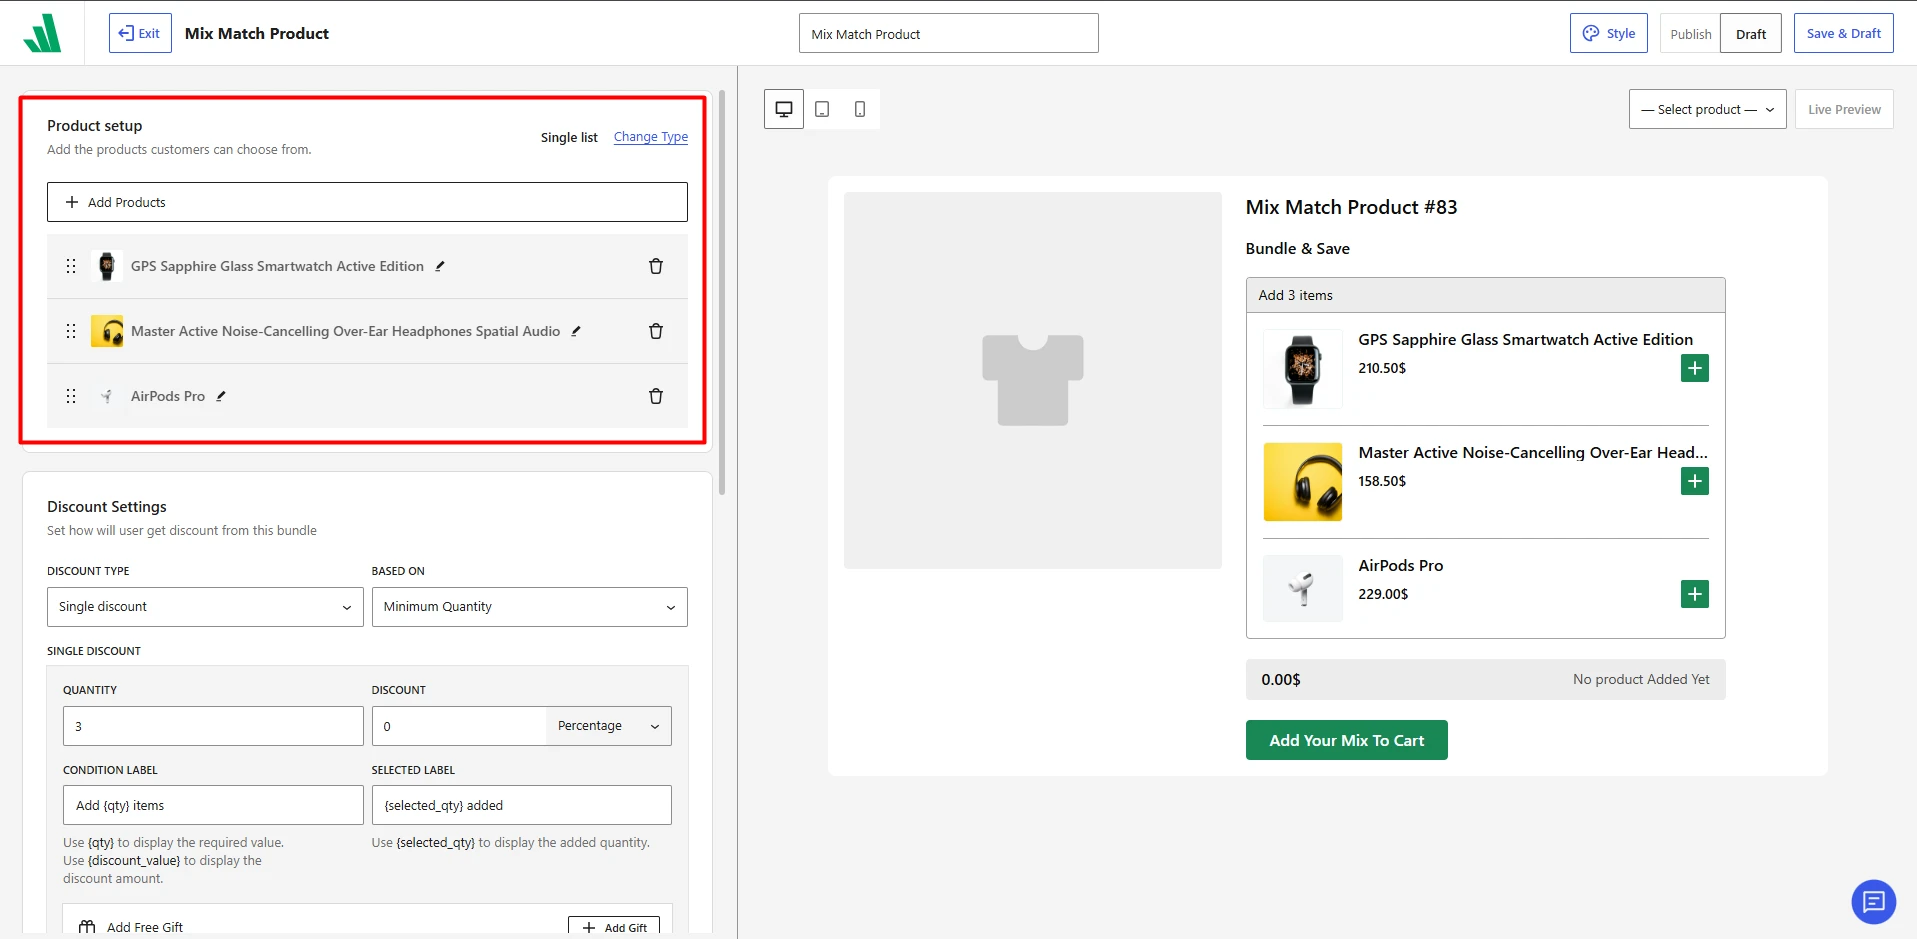
After adding products, you can:
- Rename the displayed product title.
- Rearrange products using drag and drop.
- Remove products you no longer want to include.
Choose the Discount Type
Next, use Discount Type to decide how savings should work within the Mix and Match bundle.
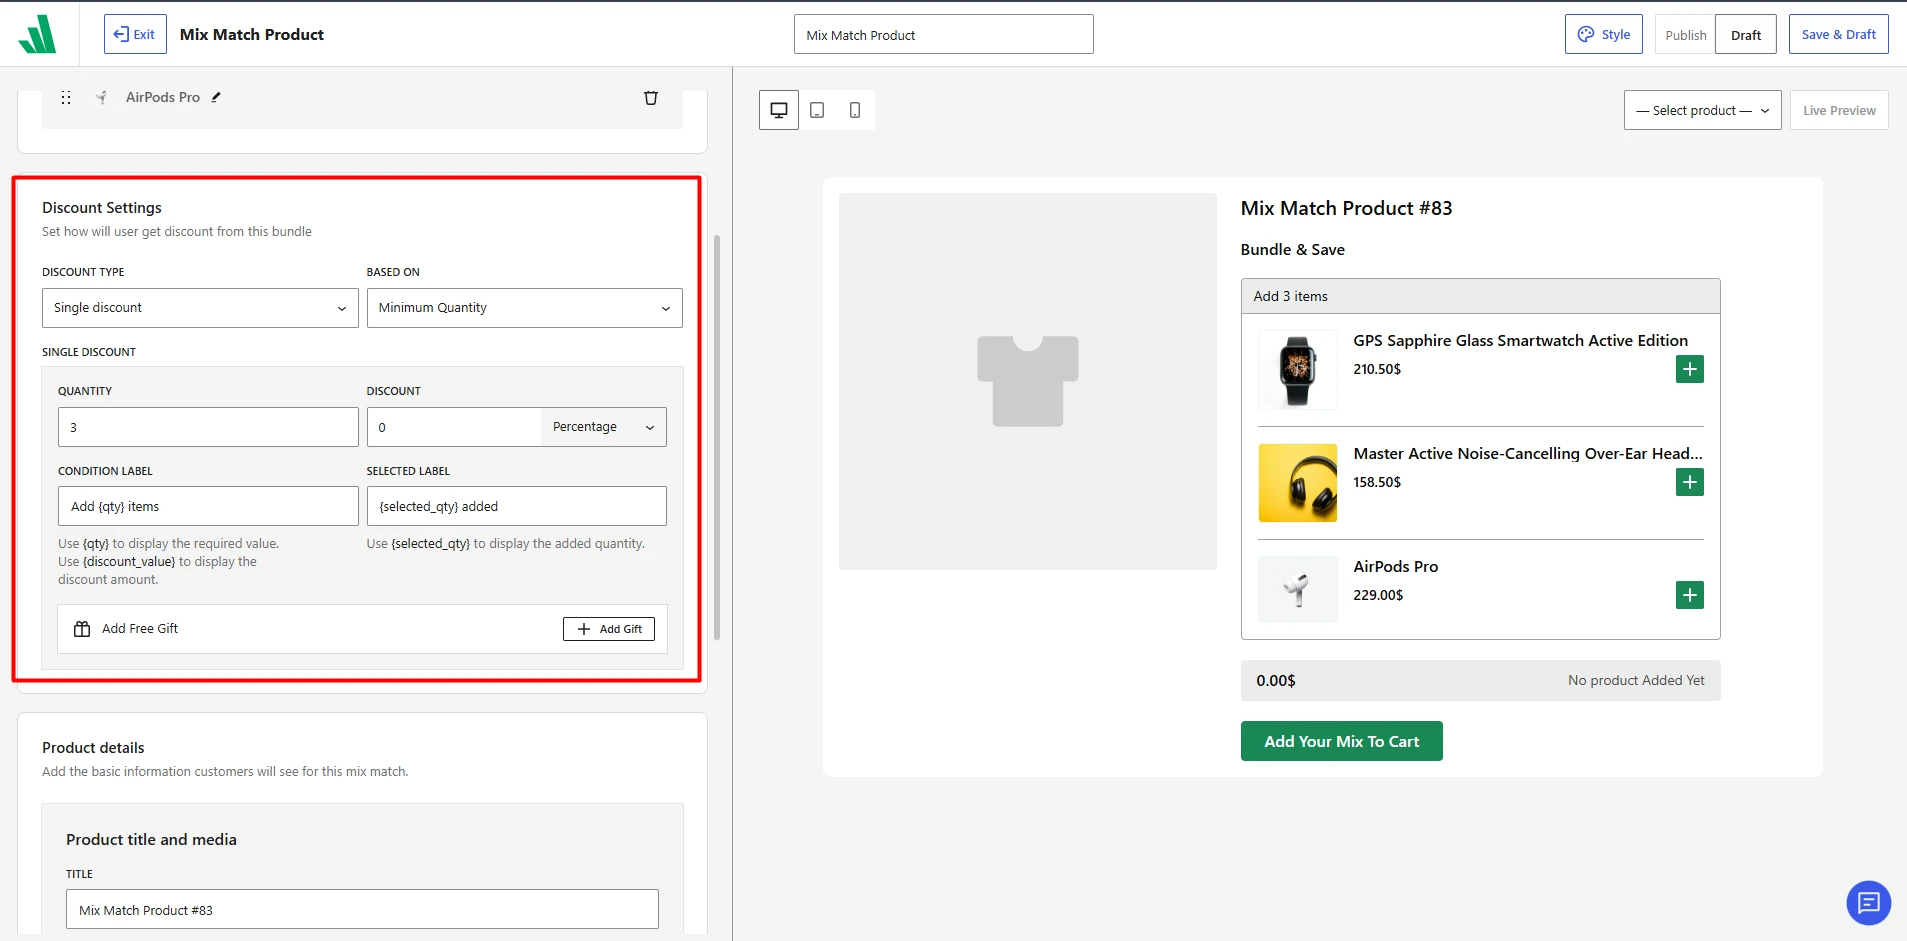
You can choose:
- No Discount if customers can build the bundle without receiving a price reduction.
- Single Discount to apply one discount when the required condition is met.
- Tiered Discount (2 Stage) to create two discount levels.
- Tiered Discount (3 Stage) to create three progressive discount levels.
Tiered discounts are useful when you want to encourage customers to add more products by increasing the reward at higher levels.
Choose Condition the Discount Is Based On
Use the Based On option to define what customers need to achieve before a discount stage becomes available.
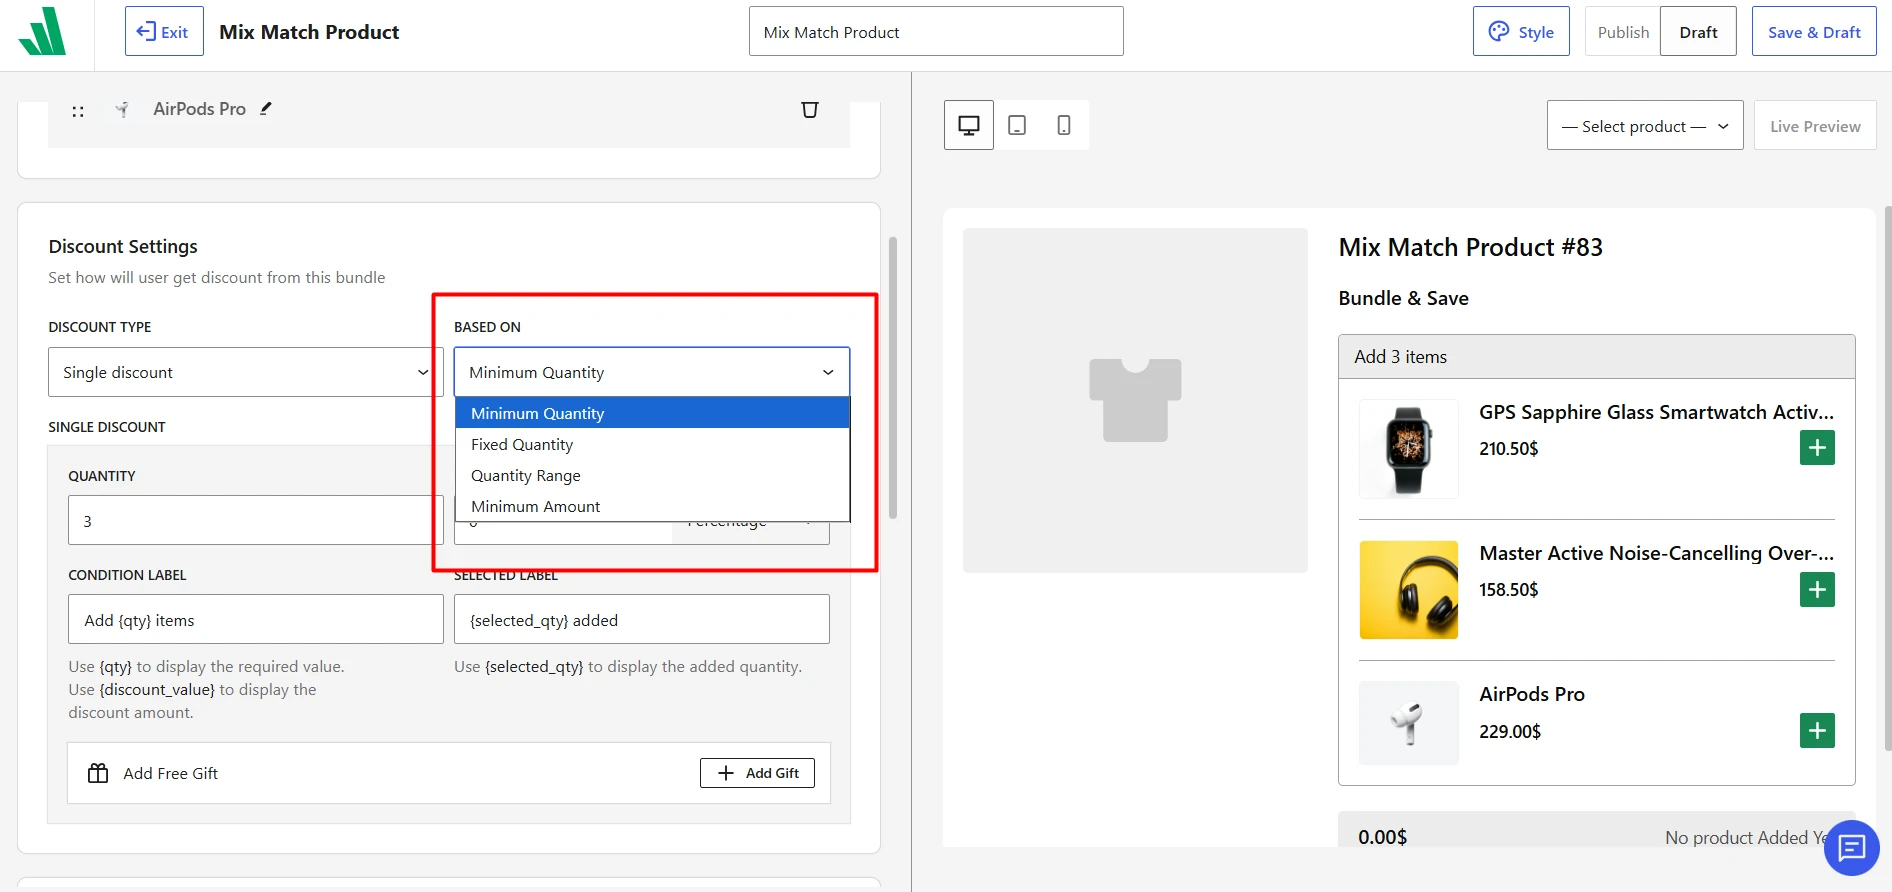
You can choose from:
- Minimum Quantity to trigger the discount once customers select at least the required number of products.
- Quantity Range to apply the discount when the selected quantity falls within a defined minimum and maximum range.
- Minimum Amount to trigger the discount when the value of the selected products reaches the required amount.
Configure the Discount Amount
If you choose the tiered discount, WowRevenue creates separate stages that you can configure individually.
For each stage, define the required quantity, range, or amount depending on the Based On condition you selected. Then enter the discount you want customers to receive.
For example:
- Stage 1: Set Quantity to 3 products and receive a discount.
- Stage 2: Set Quantity to 5 and receive a better discount.
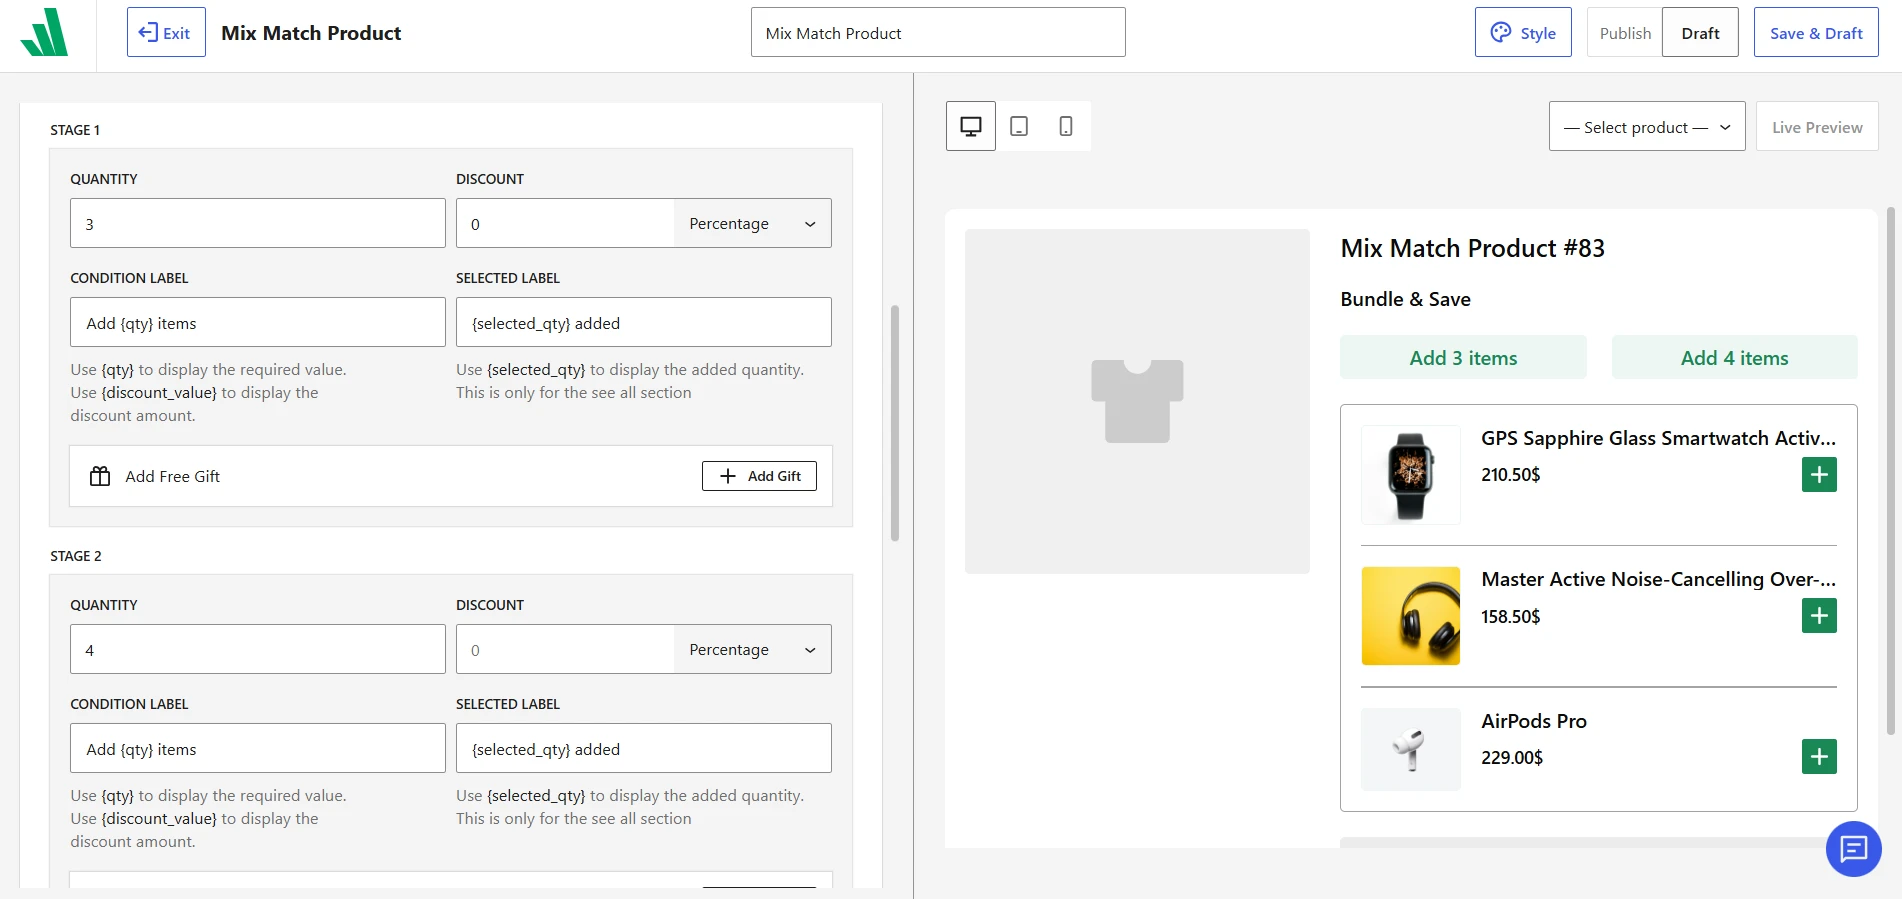
The discounts can be set either through Percentage, Fixed Discount, Fixed Price, or No Discount.
Set the Discount Stage Labels and Gifts
Each discount stage includes a Condition Label and Selected Label.
1. Use the Condition Label to tell customers what they need to do, such as:
Add {qty} items
You can use:
- {qty} to automatically show the required quantity.
- {discount_value} to automatically show the discount amount.
2. The Selected Label tells customers how many products they have already added. For example: {selected_qty} added
Use {selected_qty} to automatically display the customer’s current selected quantity.
You can also attach a Free Gift to an individual discount stage.
Click Add Gift inside the stage and choose the product you want to offer. This allows you to combine a Mix and Match discount with an additional incentive.
Mix and Match Sectioned Style
The Sectioned List layout works like the Single List Mix and Match setup, but it lets you organize products into separate sections instead of displaying everything in one list.
This is useful when customers need to choose products from different groups, such as one item from each category or collection.
Create and Customize Sections
Click Add New Section to create additional product groups.
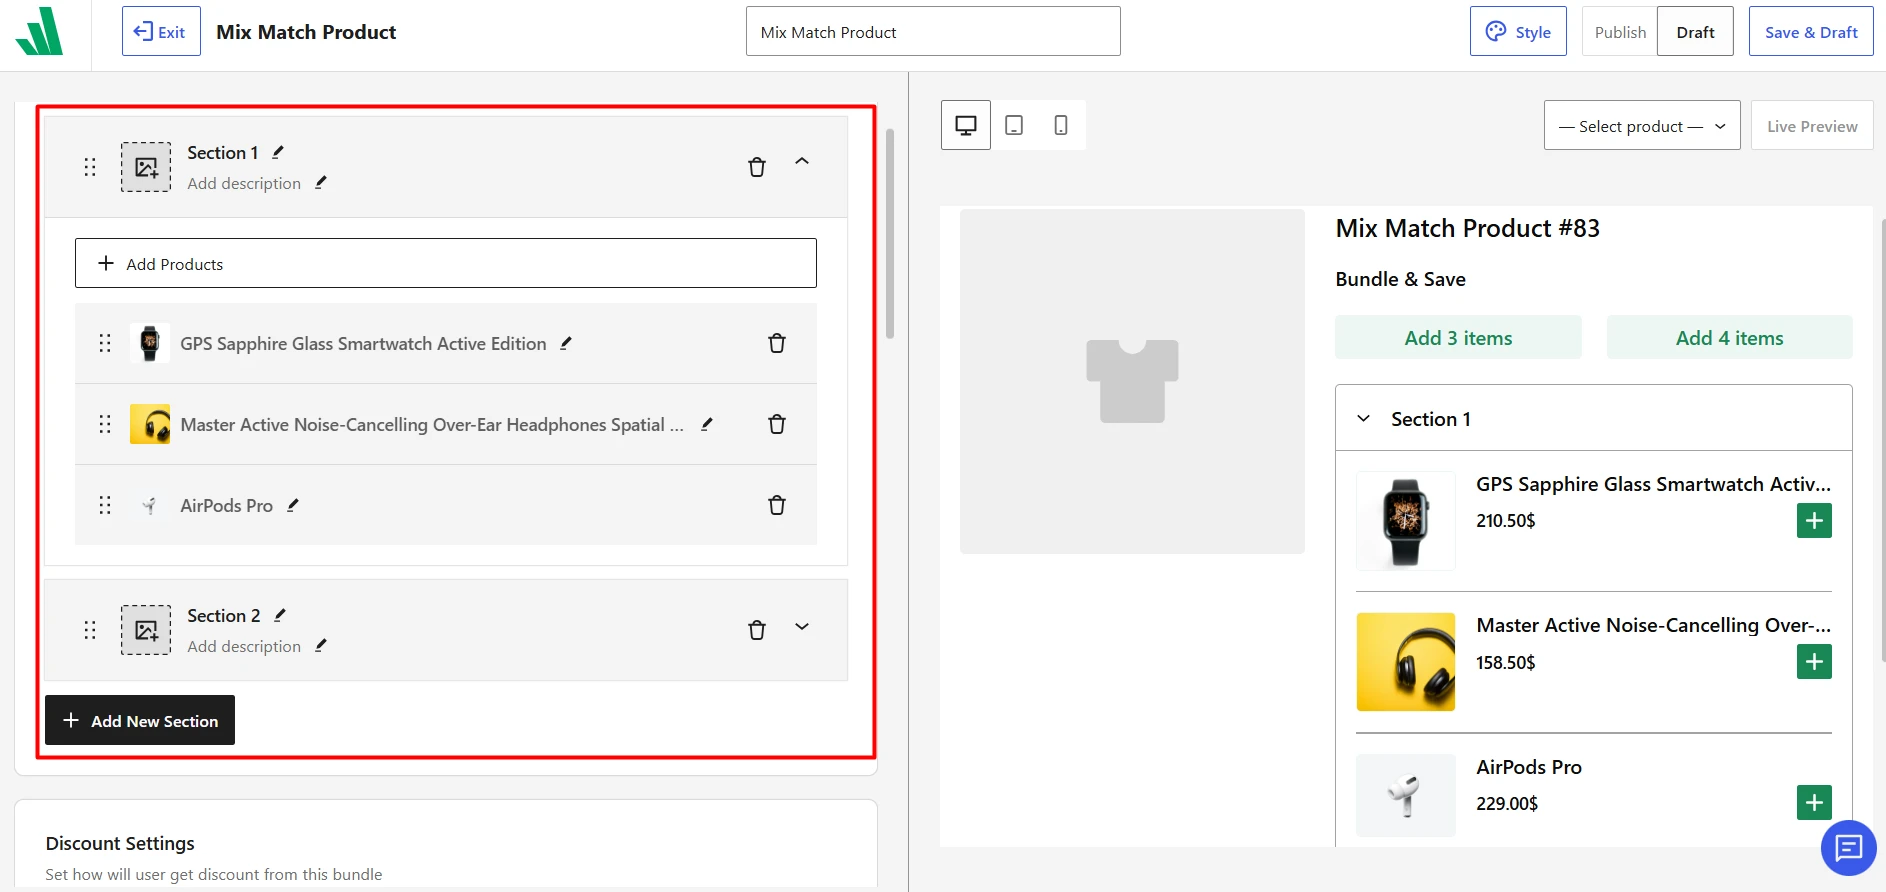
For each section, you can:
- Add a custom section name.
- Add a short description.
- Upload a section image.
- Add specific products to that section.
- Rename and rearrange products.
- Rearrange or remove sections as needed.
Each section can contain its own group of products, making it easier to guide customers through a structured bundle-building process.
Choose How Discounts Apply Across Sections
Sectioned Mix and Match bundles include additional discount options that are not available in the Single List layout.
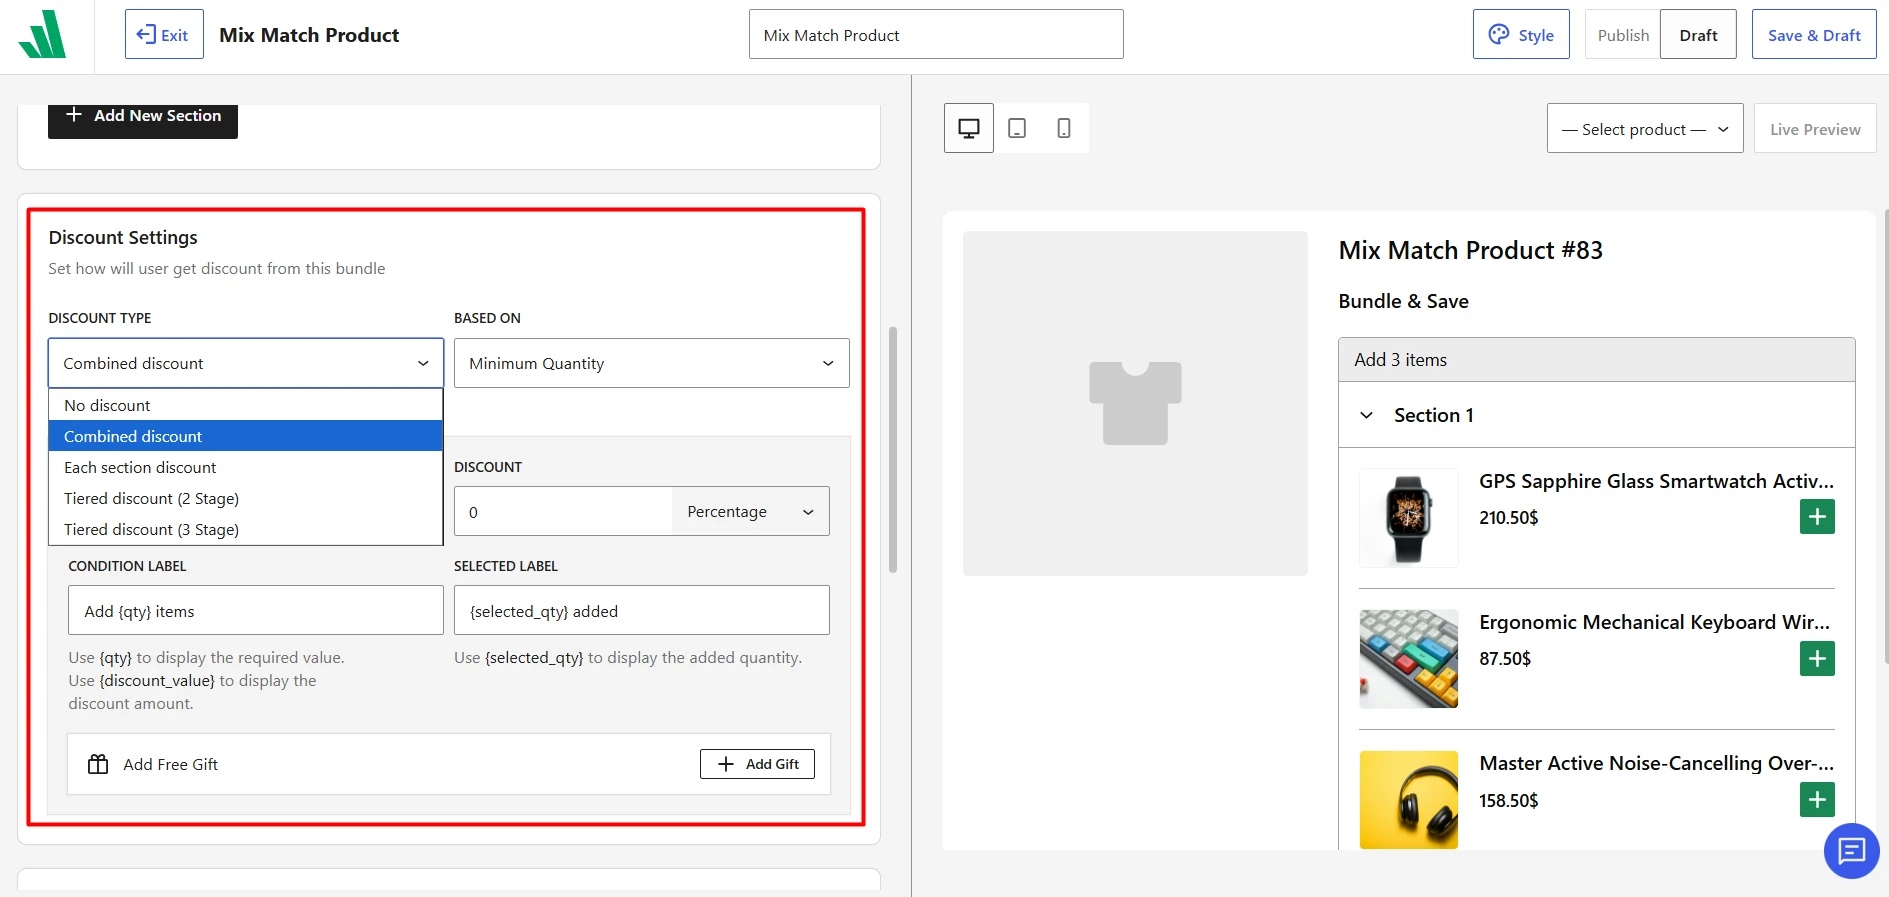
Along with No Discount and tiered discounts, you can choose:
- Combine Discount to calculate the offer based on selections made across the sections together.
- Each Section Discount to set separate requirements and discounts for every section.
The same Based On conditions from the Single List setup are available, including Minimum Quantity, Fixed Quantity, Quantity Range, and Minimum Amount.
Set a Discount for Each Section
Choose Each Section Discount when you want every section to have its own requirement and reward.
For example, Section 1 can require customers to add 3 products for a specific discount, while Section 2 can have its own quantity and discount settings.
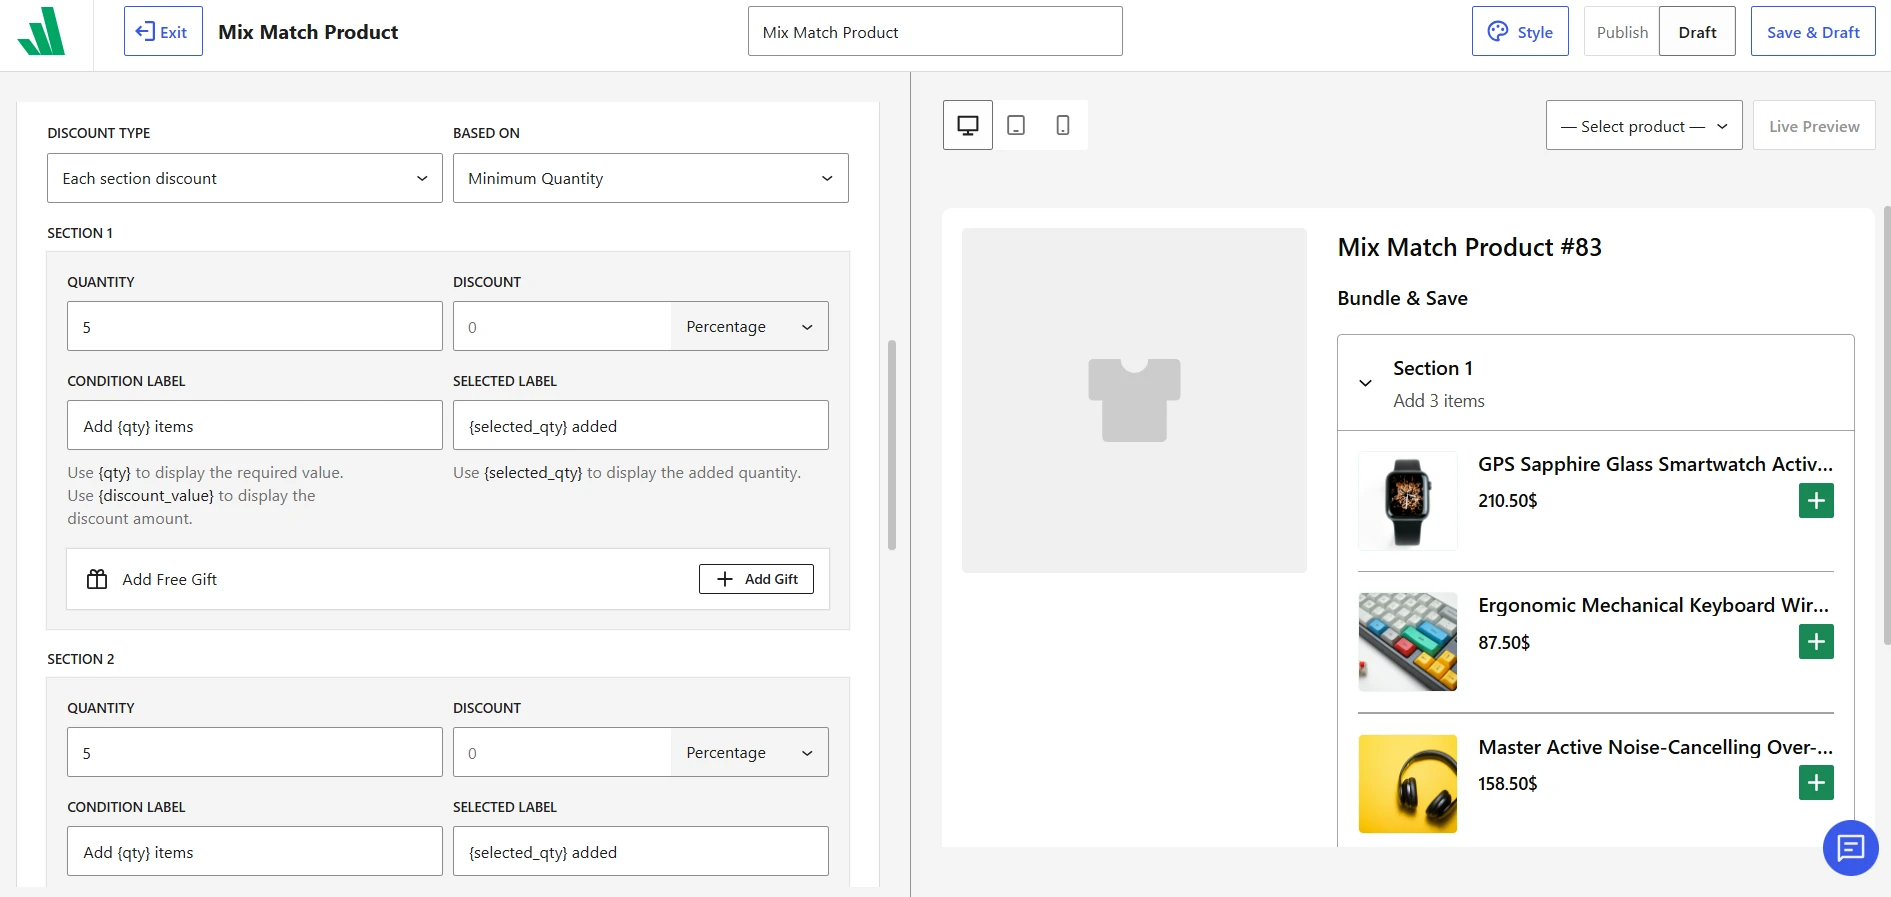
For each section, you can configure:
- Required Quantity
- Discount amount and type
- Condition Label
- Selected Label
- Free Gift
This gives you more control over sectioned Mix and Match offers where each product group needs its own buying rules.